Continuous Delivery with AWS CDK Pipelines
In this blog post I’m giving an example of how you can automate your deployment pipeline with some bleeding edge AWS technologies. Step by step we will create CI/CD pipeline using AWS CDK, CodeCommit and CodePipeline which is fully defined in TypeScript. At the end we have a simple project which uses so called Pipeline as Code.
Before diving into specifics, let me first unravel the title of this blog post: “Continuous Delivery with AWS CDK Pipelines”.
Continuous Delivery
I assume you already have an idea what Continuous Delivery means, but for this post I define it as: the discipline of being able to release your software to production at any time. Or like Josh Long says often says: “Production is my favorite place on the internet. I LOVE production. YOU should love production. You should go as early, and often, as possible. Bring the kids, the whole family. The weather is amazing! It’s the happiest place on earth!”.
AWS (Amazon Web Services)
The first and still the largest public cloud provider.
CDK (Cloud Development Kit)
AWS CDK is a software development framework for defining cloud infrastructure in code and provisioning it through AWS CloudFormation. Since about 2011 CloudFormation allowed us to codify the details of an infrastructure into a configuration file. It’s nice to have Infrastructure as Code, but for serious applications it becomes a hell to maintain these humongous YAML files. In 2019 AWS introduced an abstraction on top of Cloud Formation and called it the Cloud Development Kit (CDK) which makes it possible to describe your Cloud Application in a familiar programming language. Currently the AWS CDK supports TypeScript, JavaScript, Python, Java, and C#/.Net. It also introduced the possibility to compose and share reusable custom components, but that’s beyond the scope of this post.
CDK Pipelines
A year later, July 2020, AWS introduced CDK Pipelines which makes it easy to setup continuous delivery pipelines with AWS CodePipeline. With this new CDK construct, it becomes easy to define and share “pipelines-as-code” for your application which automatically build, test, and deploy your new version. CDK Pipelines are self-updating: if you add new application stages or new stacks, the pipeline automatically reconfigures itself to deploy those new stages and/or stacks.
To position CDK in the AWS landscape: 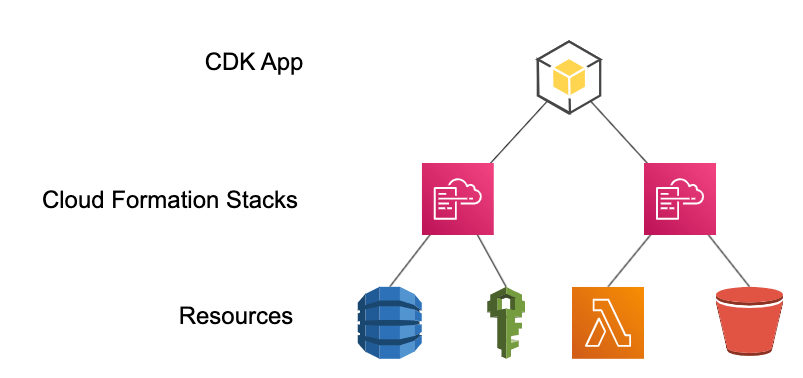 On the lowest level are the AWS Resources like for example lambda, S3 and IAM. These can be provisioned using CloudFormation Stacks. CDK provides a higher level of abstraction to define the resources. These higher level components also provide proven defaults so that you don’t need to be an expert.
Getting started
The focus of this post will be on creating pipelines-as-code, so for demonstration purposes we will create and deploy a simple application. Essentially we are going to create two CDK Applications in one Git repository, 1 CDK application for the Pipeline, and 1 CDK application for software itself. You can continue reading this post in two ways; 1) you continue reading, look at screenshots and believe me this is how it works or 2) you follow along by creating a project yourself and copy the commands and code snippets and feel how easy it is to get a fully automated continuous delivery pipeline. Either way, the end result of this post is available in a public Github repo as well.
Preparation
When you have not used CDK before, you need to install the command line interface. This can be done using NPM by running: npm install -g aws-cdk
Otherwise refer to the getting started page for AWS CDK. If you use CDK for the first time in your AWS account, CDK needs to be bootstrapped. This creates a CloudFormation Stack called “CDKToolkit” with all the required resources and permissions for execution CDK commands. So when you haven’t done this, run in a Terminal:
export CDK_NEW_BOOTSTRAP=1

cdk bootstrap
Now create a new Git repository in CodeCommit for the app. I named my project: “aws.blog.cdk-pipelines”. After the repository is created, run in a Terminal on your machine:
git clone CODECOMMIT-REPO-URL aws.blog.cdk-pipelines

cd aws.blog.cdk-pipelines
More information about creating repositories in CodeCommit and how to clone them can be found in the AWS documentation. Initialise a new project with the following commands:
cdk init --language typescript
npm install --save-dev \
	aws-cdk@1.66.0 \
	@aws-cdk/aws-apigateway@1.66.0 \
	@aws-cdk/aws-codebuild@1.66.0 \
	@aws-cdk/aws-codecommit@1.66.0 \
	@aws-cdk/aws-codedeploy@1.66.0 \
	@aws-cdk/aws-codepipeline@1.66.0 \
	@aws-cdk/aws-codepipeline-actions@1.66.0 \
	@aws-cdk/aws-lambda@1.66.0 \
	@aws-cdk/core@1.66.0 \
	@aws-cdk/aws-s3@1.66.0 \
	@aws-cdk/pipelines@1.66.0
Since CDK pipelines is still in developer preview I chose to specifically install version 1.66.0, the newest version at the time of writing. This generates a folder structure as follows: 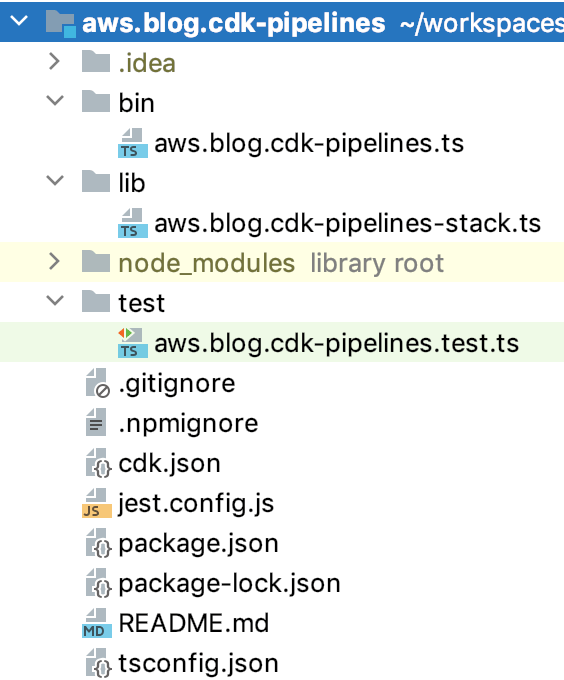 The folder bin contains the code for defining the Application. It has already generated the CDK Application for the pipeline. The folder lib contains the actual Stacks, for now it’s an empty Stack for the pipeline which we will fill in later The folder test contains tests for the Pipeline Application. We have infra as code, and a big advantage of this is that we can define testable infra as code! You can run `npm run test` if you want. In this post we skip testing our pipeline-as-code, so replace the contents of `test/cdk-test.test.ts` with:
test('Placeholder test which never fails', () => {

});
Otherwise the test will fail after the changes we are about to make. Finally, add the @aws-cdk/core:newStyleStackSynthesis feature flag to the project’s cdk.json file. The file will already contain some context values; add this new one inside the context object.
{
  ...
  "context": {
    ...
    "@aws-cdk/core:newStyleStackSynthesis": "true"
  }
}
In a future release of the AWS CDK, “new style” stack synthesis will become the default, but for now we need to opt in using the feature flag.
Create the pipeline
Replace the contents of `lib/aws.blog.cdk-pipelines-stack.ts` with:
import {Repository} from "@aws-cdk/aws-codecommit";
import {Artifact} from "@aws-cdk/aws-codepipeline";
import {CdkPipeline, SimpleSynthAction} from "@aws-cdk/pipelines";
import {CodeCommitSourceAction} from "@aws-cdk/aws-codepipeline-actions";
import {Construct, Stack, StackProps} from "@aws-cdk/core";

export class AwsBlogCdkPipelinesStack extends Stack {
  constructor(scope: Construct, id: string, props?: StackProps) {
    super(scope, id, props);

    const repoName = "aws.blog.cdk-pipelines";	// Change this to the name of your repo
    const repo = Repository.fromRepositoryName(this, 'ImportedRepo', repoName);

    const sourceArtifact = new Artifact();
    const cloudAssemblyArtifact = new Artifact();

    const pipeline = new CdkPipeline(this, 'Pipeline', {
      pipelineName: 'MyAppPipeline',
      cloudAssemblyArtifact,

      // Here we use CodeCommit instead of Github
      sourceAction: new CodeCommitSourceAction({
        actionName: 'CodeCommit_Source',
        repository: repo,
        output: sourceArtifact
      }),

      synthAction: SimpleSynthAction.standardNpmSynth({
        sourceArtifact,
        cloudAssemblyArtifact,
        // Use this if you need a build step (if you're not using ts-node
        // or if you have TypeScript Lambdas that need to be compiled).
        buildCommand: 'npm run build && npm run test',
      }),
    });


    // Here we will add the stages for the Application code later


  }
}
Commit all changes and push it.
git add --all

git commit -m "initial commit"

git push
Now run `cdk deploy`, this will show an overview of all the resources that will be created. When asked “Do you wish to deploy these changes?” enter y. This can take while for the first time so be patient. In AWS Console you can go to CloudFormation to see that a Stack named ‘AwsBlogCdkPipelinesStack’ is created and how it looks like. In the case you face weird inexplainable issues while deploying the Stack, try removing the folder `cdk.out` and try it again. Now open CodePipeline in the AWS Console and when the Cloudformation Stack is created you should see a pipeline named “AwsBlogCdkPipeline” with 3 stages:  1. Source stage is checking out the Git repository 2. Build stage performs the Synth action, in our case that is building all the code in this project, which until now is only the pipeline code 3. The UpdatePipeline stage performs the SelfMutate action which changes this current pipeline Thanks to the last stage this was the last time we needed the CDK command, the following changes can all be done via Git commits.
Create the application
Let’s start with creating code for the lambda itself. Create `src/greeting.ts` and copy the following contents:
const DEPLOY_TIME = process.env.DEPLOY_TIME!
console.info("I was deployed at: %s", DEPLOY_TIME);

export async function handler(event: any) {
    console.debug("Received event: ", event);
    return {
        statusCode: 200,
        body: "Hello from AWS Lambda, DEPLOY_TIME: " + DEPLOY_TIME
    };
}
And because we’re well behaving developers, we also create a test for our application code. Create `src/greeting.test.ts` and copy:
import {handler} from './greeting'

describe('Test calculationHandler', function () {
    it('Happy flow', async () => {
        let emptyBody = {};
        let event = {body: emptyBody };

        const result = await handler(event);
        expect(result.statusCode).toEqual(200);
    });
});
Now open `jest.config.js` in the root of the project folder and remove “/test” from line 2 so that it results in:
roots: ['<rootDir>'],
Now also our application code is tested during the build stage of our pipeline (triggered by `SimpleSynthAction.standardNpmSynth()` in `aws.blog.cdk-pipelines-stack.ts`). The test can be executed by running `npm run test` or by pushing some button in your favorite IDE.
Now that we have a very basic application, let’s create the infra for it. Next to the pipeline stack, we create a second stack for our application. Create the file `lib/aws.blog-lambda-stack.ts` and copy the contents:
import {AssetCode, Function, Runtime} from "@aws-cdk/aws-lambda"
import {CfnOutput, Duration, Stack, StackProps} from '@aws-cdk/core';
import {Construct} from "@aws-cdk/core/lib/construct-compat";
import {LambdaIntegration, RestApi} from "@aws-cdk/aws-apigateway"

export class AwsBlogLambdaStack extends Stack {
  public readonly urlOutput: CfnOutput;

  constructor(app: Construct, id: string, props?: StackProps) {
    super(app, id, props);

    // Configure the lambda
    const lambdaFunc = new Function(this, 'BlogLambda', {
      code: new AssetCode(`./src`),
      handler: 'greeting.handler',
      runtime: Runtime.NODEJS_12_X,
      memorySize: 256,
      timeout: Duration.seconds(10),
      environment: {
        DEPLOY_TIME: new Date().toISOString()   // Example of how we can pass variables to the deployed lambda
      },
    });

    // Configure API in API Gateway
    const api = new RestApi(this, 'blog-greetingsApi', {
      restApiName: 'Greeting Service'
    });
    // Integration with the lambda on GET method
    api.root.addMethod('GET', new LambdaIntegration(lambdaFunc));

    // Make the URL part of the outputs of CloudFormation (see the Outputs tab of this stack in the AWS Console)
    this.urlOutput = new CfnOutput(this, 'Url', { value: api.url, });
  }
}
This is the definition of the Stack of our Application, which should be added to the pipeline. For this we have to open up the file `lib/aws.blog.cdk-pipelines-stack.ts`. We start with creating a custom Stage for our application, so copy the contents below just after all the imports (above `export class AwsBlogCdkPipelinesStack`):
export class AwsBlogApplicationStage extends Stage {
    public readonly urlOutput: CfnOutput;

    constructor(scope: Construct, id: string, props?: StageProps) {
        super(scope, id);
        const lambdaStack = new AwsBlogLambdaStack(this, 'AwsBlogLambdaStack');
        this.urlOutput = lambdaStack.urlOutput;
    }
}
Later on it becomes clear why created a custom Stage here. Now scroll down to the bottom. Below the comment:
// Here we will add the stages for the Application code later
and paste:
	let testEnv = new AwsBlogApplicationStage(this, 'Test-env');
	const testEnvStage = pipeline.addApplicationStage(testEnv);
When you using a proper IDE it can automatically import the newly used classes for you. Otherwise you can replace all imports with:
import {Repository} from "@aws-cdk/aws-codecommit";
import {Artifact} from "@aws-cdk/aws-codepipeline";
import {CdkPipeline, SimpleSynthAction} from "@aws-cdk/pipelines";
import {CodeCommitSourceAction} from "@aws-cdk/aws-codepipeline-actions";
import {CfnOutput, Construct, Stack, StackProps, Stage, StageProps} from "@aws-cdk/core";
import {AwsBlogLambdaStack} from "./aws.blog-lambda-stack";
Now we have everything needed for the pipeline to deploy the stack for the application code. Commit and push this, and follow the progress in Pipeline of the AWS Console. Please be patient, because it can take a while, especially the first time. After the stage UpdatePipeline is finished the Pipeline the new stage for ‘Test-env’ should be visible. 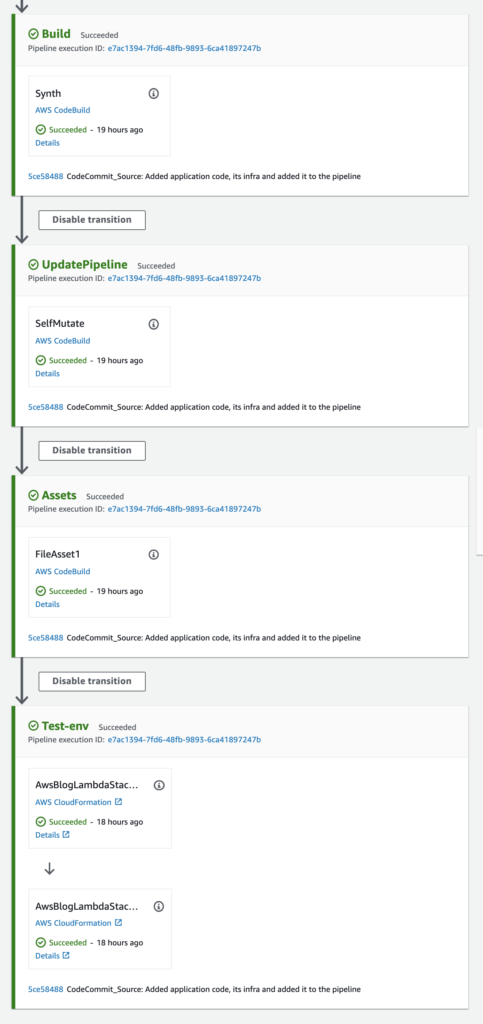 When you want to access the deployed API, scroll down in the pipeline to the last action “AwsBlogLambdaStack.Deploy” and click on “Details” to open the Stack in CloudFormation, then go to the tab “Outputs”. The Key “Url” shows the URL of your freshly deployed API. Just click on it to see that it works. Another trick to retrieve the URL of this API is with the command:
aws cloudformation describe-stacks --stack-name Test-env-AwsBlogLambdaStack \

--query "Stacks[0].Outputs[?OutputKey=='Url'].OutputValue" \

--output text
Now we have a simple, but fundamental base on which we can build upon. Before we wrap up I want to demonstrate how easy it can be to make this pipeline more comprehensive. As you may have noticed, I named last stage “Test-env”. It would be nice to create a production environment as well. But then again, when should we deploy to Prod? Most of the time we want some sort of verification before the code is rolled out to Production.
Create the Production environment
We will add 1 automated verification step and 1 manual verification step. When both pass, our new commit is allowed to be deployed to Production. Open `lib/aws.blog.cdk-pipelines-stack.js` and scroll down to line 55, below the line we’ve defined `testEnvStage`. Then copy the following contents:
        testEnvStage.addActions(
            // Add automated verification step in our pipeline
            new ShellScriptAction({
                actionName: 'SmokeTest',
                useOutputs: {
                    ENDPOINT_URL: pipeline.stackOutput(testEnv.urlOutput),
                },
                commands: ['curl -Ssf $ENDPOINT_URL'],
                runOrder: testEnvStage.nextSequentialRunOrder(),
            }),
            // Add manual verification step in our pipeline
            new ManualApprovalAction({
                actionName: 'ManualApproval',
          		externalEntityLink: "https://hardcoded-url.execute-api.eu-west-1.amazonaws.com/prod/",
                runOrder: testEnvStage.nextSequentialRunOrder(),
            })
        );

        // Deploy to the Production environment
        let prodEnv = new MyApplication(this, 'Prod-env');
        const prodStage = pipeline.addApplicationStage(prodEnv);
        // Extra check to be sure that the deployment to Prod was successful
        prodStage.addActions(new ShellScriptAction({
            actionName: 'SmokeTest',
            useOutputs: {
                ENDPOINT_URL: pipeline.stackOutput(prodEnv.urlOutput),
            },
            commands: ['curl -Ssf $ENDPOINT_URL'],
        }));
Again, I hope you’re using an IDE which can auto-import the new classes for you. Otherwise replace all the imports on top of the file with:
import {Repository} from "@aws-cdk/aws-codecommit";
import {Artifact} from "@aws-cdk/aws-codepipeline";
import {CdkPipeline, ShellScriptAction, SimpleSynthAction} from "@aws-cdk/pipelines";
import {CodeCommitSourceAction, ManualApprovalAction} from "@aws-cdk/aws-codepipeline-actions";
import {CfnOutput, Construct, Stack, StackProps, Stage, StageProps} from "@aws-cdk/core";
import {AwsBlogLambdaStack} from "./aws.blog-lambda-stack";
Now commit and push and open the pipeline in the AWS Console to follow the progress. 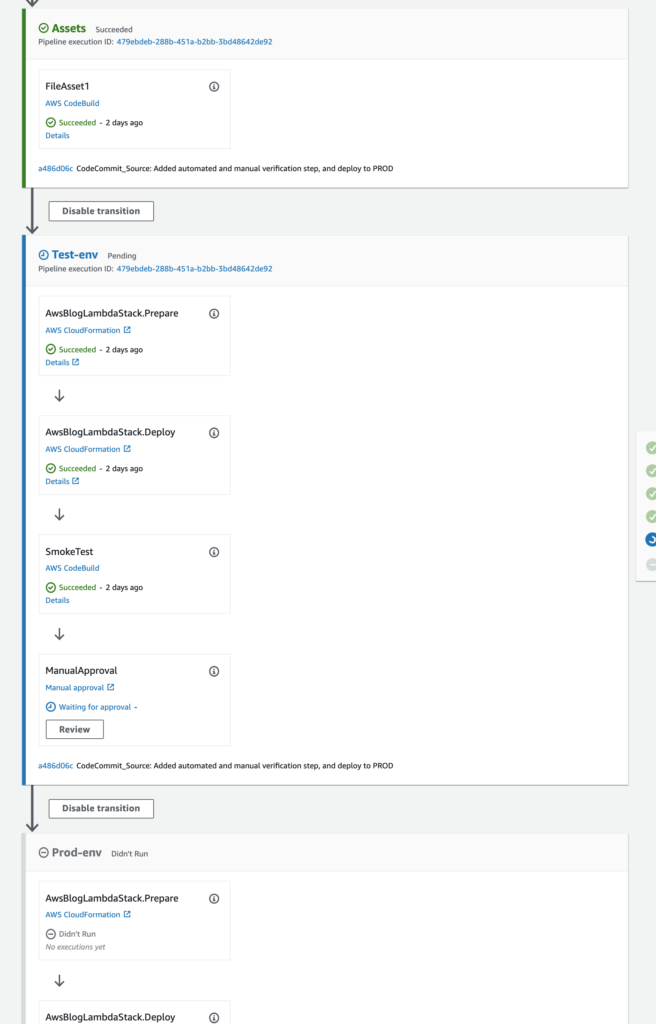 Now we added 2 actions to the stage for the test environment. The first is ShellScriptAction which is run directly after the deployment is done. In this example we simply use a cURL command as automated action to verify that our service is up and running. This action will fail when the call does not return a HTTP 200. This action could be changed to invoking a shell script from this repository or even to run an “integration test suite”. The second step we added is manual verification. At this action the pipeline will hold until someone manually approves or rejects this change. In the screenshot above you may notice a “Review” button, when this is clicked a popup is opened when you can approve or reject the change.
 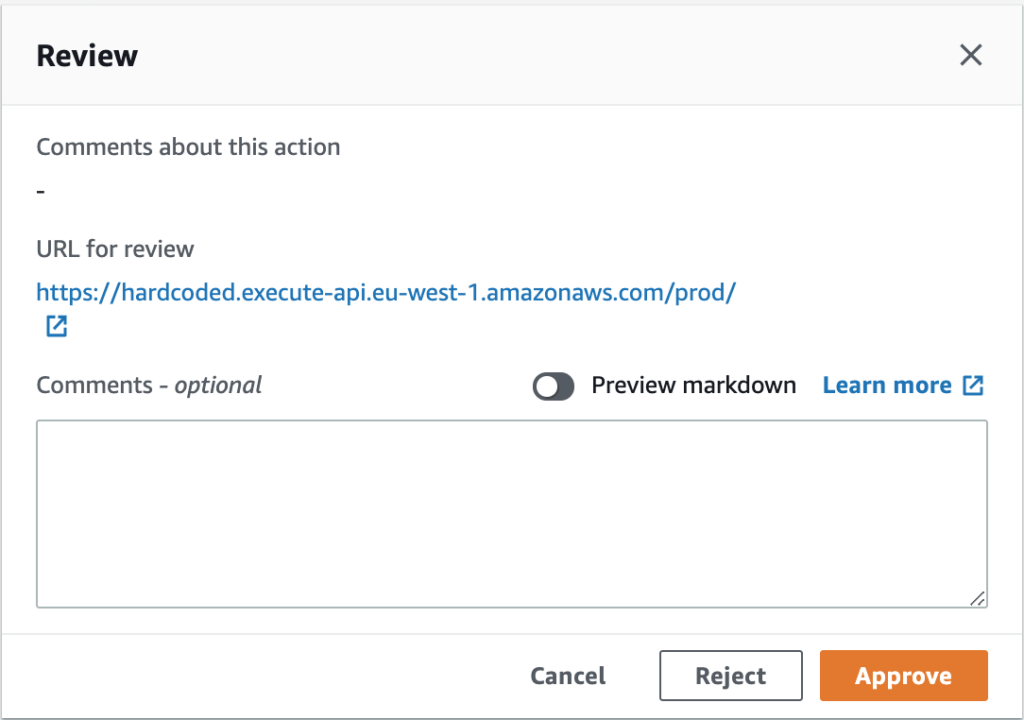 It even has an option to show the URL for review, but I have no idea how we can set it to the URL of our generated environment. In ShellScriptAction we could use the Stack outputs, but that is not (yet?) supported by ManualApprovalAction. As an example I set “externalEntityLink” to a hardcoded URL, but that is not recommended. Also, when multiple pushes happen simultaneously, it is unclear which change your are reviewing or approving. In such scenario’s you probably want an environment per change. But that’s food for another blog post.
Conclusion
I demonstrated how you can create your own pipeline in just a few steps while it’s fully defined in version control. The end result of this post is shared in this Github repo. See for yourself how little files were needed to get this up-and-running. In my experience you can create a pipeline quite fast yourself using the new CDK pipelines construct.
It is still in developer preview and there’s much to add. But this is how it mostly goes with new services in AWS. First get it out to the users, listen to their feedback, and polish it. So I have high hopes that the current shortcomings will be improved. When your projects are already running in existing infrastructure I certainly would not move it directly. But when starting a new AWS project I would definitely use CDK for provisioning the resources and I would strongly consider using the CDK CodePipeline as well. In this example I used the inferior AWS CodeCommit, but you can easily integrate with other systems like Github, Gitlab or Bitbucket.
Cleaning up
To avoid unexpected AWS charges, destroy your AWS CDK stacks after you’re done. To be sure, open CloudFormation in the AWS console and manually Delete the stacks “Test-env-AwsBlogLambdaStack” and ” Prod-env-AwsBlogLambdaStack”. Then destroy the CDK application with the command:
cdk destroy AwsBlogCdkPipelineStack
This deletes the CloudFormation Stack and all its related resources. The used s3 buckets are emptied, but not automatically deleted. So these should be deleted manually. For me there were several buckets which name started with awsblogcdkpipelinesstack-.
Finally, delete the AWS CodeCommit repository from the AWS Console.
References
This post is based on creating a CDK app and supplemented with CDK pipelines HOWTO and finally sprinkled with some research and knowledge of my own. Please refer to these pages when you want more background information. Some more related links:
- https://cdkworkshop.com/
- https://github.com/aws-samples/aws-cdk-examples
- Other ways of deploying your code to AWS:
Training: Continuous Integration / Continuous Delivery
In order to deploy features quickly and reliably, a good continuous integration (CI) and continuous delivery (CD) setup is a prerequisite. A proper CI/CD pipeline automates error prone steps and gives both developers and management confidence in deployment often and...